A tank that hisses long after flushing, refills without end, crawls to full, or climbs too high is usually blaming one small component. Replacing it costs a modest amount and an afternoon, with an adjustable wrench as the only real tool. The plan: stop the supply, drain the tank, take out the worn unit, seat the new one, and aim the water level a little under the overflow pipe. Wider fixes sit under toilet repair; a bowl that keeps running is handled separately in repairing a running toilet.
Is the fill valve really what has failed?
Lift the lid and keep your eyes on the water for a minute after flushing. A stream that never quits into the overflow pipe, endless hissing, or a tank stuck below its line all implicate the fill valve. If water is instead creeping from tank to bowl, suspect the flapper and the ring it sits on.
Dye settles the argument in ten minutes. Drop some into the tank, leave the toilet alone, and check the bowl. Any color there means the flapper leaks, which echoes the toilet check in the EPA leak guidance. Clear bowl water plus a running sound means the valve will not shut off, or the float is set high. A slow refill tends to trace back to sediment inside the valve head, or to a wall shutoff that was left half open.
Which type of fill valve does my tank have?
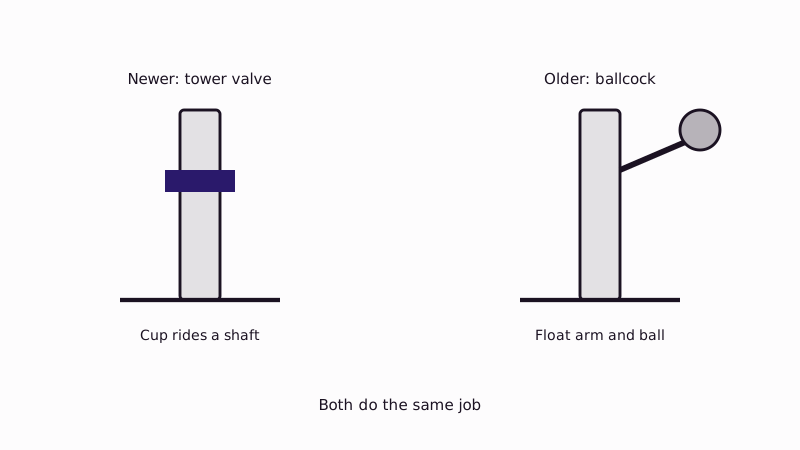
Newer tanks use a plastic tower, with a cup that rides up a central shaft. Older ones use a ballcock, a metal arm ending in a floating ball. Both do the same job. The tower is quieter, cheaper and simpler to adjust, so it is what most people install when they replace either type.
Brand matching is not necessary. Universal towers fit nearly every standard tank, and their height adjusts. Measure the tank's depth and note how far the supply pipe reaches, then buy a model made for that. Slim tanks in older Westside bungalows sometimes need a low-profile valve. Skip any replacement whose arm will not clear the tank wall.
How do I actually change the valve?
Begin at the wall valve and flush the tank empty, then sponge up the remainder. Then detach the supply line and the locknut holding the old valve, and lift it clear. Set the new valve to the height marked on its body, finger-tighten the nut and add just a nudge with the wrench, reattach the supply, hook the refill hose over the overflow pipe, and bring the water back slowly.
- Turn the oval wall handle clockwise, then hold the flush lever down to empty the tank.
- Lay a towel and a small bucket on the floor, since some water is trapped in the line.
- Back out the coupling nut joining the supply line to the valve.
- Loosen the fat plastic locknut on the tank's underside and draw the worn valve upward through the opening.
- Raise or lower the new valve to the height its instructions list, so its top clears the overflow rim by the stated amount.
- Seat it in the tank hole and hand-tighten the nut. A small extra twist is enough, since too much force cracks porcelain.
- Reattach the supply, clip the small tube to the overflow, and let the tank refill while you check for drips.
Where should the water level sit?
Aim for a fill line roughly one inch shy of the overflow tube's opening, or use the line already molded into the tank. A high level sends water down the overflow around the clock; a low one gives weak flushes. Make small float or screw adjustments, flush, then look again before touching anything else.
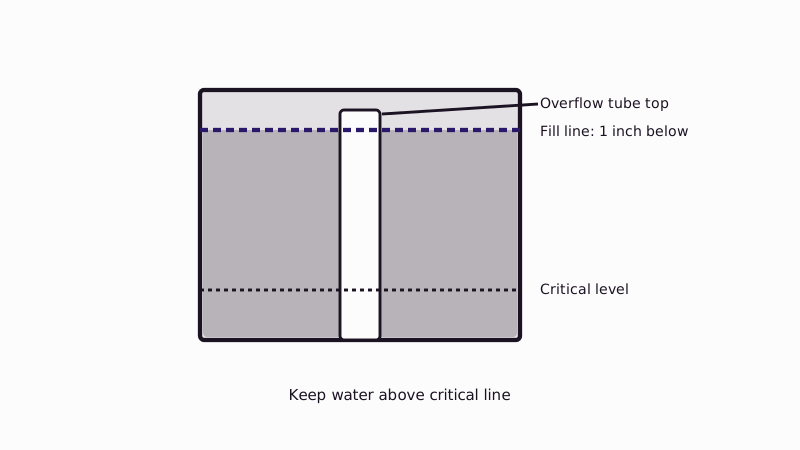
Most valves also carry a critical-level line, the mark that must stay above the water so tank water cannot be sucked back into the supply. Follow your model's printed instructions. When the level looks right, flush three times and run a dry fingertip along the supply nut to feel for seepage.
Should the flapper be replaced at the same time?
For any toilet past its first few years, yes. Flapper and seat grow old together, the tank is empty anyway, and the part costs little. A stiff or warped flapper lets water ooze into the bowl, which is why the fill valve seems to wake up and run by itself now and then.
Match the flapper to the drain opening, usually two or three inches, and leave a touch of slack in the chain so it can seat fully. Wipe the seat with a cloth first. Mineral crust from hard water collects there and spoils the seal. Instructions for that part alone are on toilet flapper repair.
What if the supply line to the toilet bursts?
Braided supply hoses can split at the connector, mostly when old or kinked. Close the wall valve right away. If that valve will not budge, shut the main instead, and then mop up. Install a new hose rated for the fitting. Changing it during a fill valve job is smart, because it is already disconnected.
Look the stop valve over while you are there. A crusty or weeping one should be replaced before it fails, and a split hose can empty a surprising amount of water into a bathroom within minutes. Make sure everyone at home can find the main shutoff. For temporary measures on other lines, read about leaks in plastic pipe.
Where does DIY stop and a plumber start?
Call someone in when the wall shutoff will not turn, the tank is cracked, the fitting at the wall seeps, or the idea of unbolting the whole toilet is a step too far. A tired old toilet that keeps failing can cost less to replace than to keep fixing, and a visit also makes sense if the true trouble is the drain.
Sometimes a drain inspection shows the sewer line is the culprit and the toilet is fine. Pricing for a brand-new toilet is in toilet replacement cost. The state wants a contractor license behind any job that hits $1,000. Fill out the quote page and a local plumber can be lined up to come by.
Common questions
Is this a quick afternoon job?
Mostly yes. Budget thirty to sixty minutes for your first attempt, mostly for emptying the tank and seating the new part. A second toilet goes faster. Add time if the wall valve needs replacing too, or if the tank bolts are corroded.
Could a running toilet be behind a jump in my water bill?
Yes. A silent leak from tank to bowl can waste many gallons a day, and the EPA names toilets among the usual sources of household leaks. The dye test settles it. A fuller checklist is under why a water bill goes high.
Must the main be closed first?
Usually not; the little valve at the wall does the job. If it sticks or leaks when you move it, close the main and replace that valve before starting on the fill valve. Swapping that valve costs little next to the flood a failing one can cause.
Why does the new valve still hiss?
Check the height setting, the water level and any debris in the valve head. Supply pressure over 80 psi can also make valves chatter, so a gauge reading helps. Clean the head, adjust the float, and test once more. A hiss that survives all that points to a defective part.
The rest of our guides start from plumber santa monica.
Sources used
- EPA WaterSense, Fix a Leak Week (toilet dye test)
- Toilet fill valve manufacturers' installation instructions (Fluidmaster, Korky, Kohler), reviewed November 2026
- California Contractors State License Board, hire a contractor
Page updated